Hi everyone! Today is a big day, I have a waterfall card tutorial for you as promised! :) Now I know this looks a little intimidating, but it's not really. After you get a couple under your belt you'll realize just how easily they can be put together. These little cards are very easy for mass producing too.
*blogger note - sorry, my tutorial does not look anywhere near as good as Paulina's always do...how does that girl make everything look so perfect...sigh!!
Are you ready...here we go!
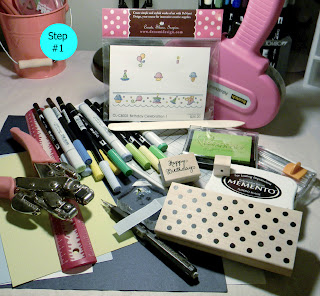
Step
#1 – supplies needed
DeNami
items used:
CL-F216 Happy Birthday Script
(Cling), CL-CB001 Birthday Celebration 1 Set (Cling), A93 Teeny Swiss Dot, N133
Polka Dot Background, E106 Small Happy Birthday stamps
Other
items used:
navy
cardstock, 3 brads, hole punch, ruler, pencil, bone folder, ATG, paper trimmer,
Tombow & Copic Sketch markers
Step #2 – cutting
cardstock
1 piece each
navy 4 ½” X 5 ½”
lime 4” X 5 ¼”
sky blue 1” X 4”
navy 2” X 9 ½”
white 1
7/8” X 4 ½”
4 pieces each
sky blue 2” X 2”
white 1 7/8” X 1 7/8”
Step
#3: - stamping
Stamp
/ decorate the following panels as desired:
lime 4” X 5 ¼”
sky blue 1” X 4”
navy 2” X 9 ½”
white 1 7/8” X 4 ½”
white 1 7/8” X 1 7/8”
Note – when stamping the 1 7/8” X 4 1/2” panel,
make sure to stamp your sentiment near the top so that it stays hidden until
the card is fully opened.
Step
#4 – scoring
Using the 2” X 9 ½” strip, score lines at 2”, 2 ¾”,
3 ½” & 4 ¼”.
Step
#5 – attaching panels
Punch
holes in either end of the 1” X 4” strip, centered and approximately ½” in from
the edge. Dry fit strip onto the 4” X 5 ¼” panel. The bottom edge of the strip
should be approximately ¾” up from the bottom edge of the panel. Mark and punch
holes. Attach the two pieces with 2 of
the brads. Attach this panel to the larger 4 ½” X 5 ½” panel.
Step
#6 – make “waterfall”
Attach
the 1 7/8” squares to the 2” squares and set aside. Using the 2” X 9 ½” strip,
fold it over at the 4 ¼” score line (mountain side showing) and apply adhesive
as shown in the picture being careful to not get adhesive on the score lines.
Step
#7 – attach “waterfall”
Attach
the 2” squares just under the score lines in the order you want them to show
starting with the bottom one first.
Step
#8 – attach “waterfall”
Open
the strip and attach the white 1 7/8” X 1 7/8” to the large non scored area as
shown. Punch hole in strip and ribbon, attach with brad.
Step
#9 – finishing the card
Slip
the bottom part of the 2” X 9 ½” strip under the 1” X 4” strip on the panel and adjust it so the
bottom edge lines up with the bottom edge of the 4” X 5 ¼” panel. When it’s
where you want it, apply adhesive to the top edge of the 1” X 4” strip as shown
in the picture and fold the scored part of the 2” X 9 ½” strip over so that the
top edge attaches to the 1” X 4” strip.
The finished card...,
*you
may have to open and close your card a few times to loosen it up depending on
how thick your cardstock is*
I hope you enjoyed my tutorial and I
have my fingers crossed that I explained everything thoroughly and you
understand everything, if not, just drop me an e-mail and I'll be more
than happy to help you out!


