Thursday, January 31, 2013

You're sweet treat

Ever since I came up with the adorable stocking card I made for Christmas, I've wanted to play with the layout a little more. I liked the idea of a flat panel...kinda postcard style card and wanted to see what else I could create using that concept.

It didn't take me long to come up with this sweet little treat.....
You don't want to know how many boxes of conversation hearts I went through to get all those pink hearts ;)

 
I started off with a kraft panel and layered on a cream panel that I had stamped a pretty little pattern on. For the 3rd panel (pink) I stamped the teeny heart background, randomly stamped the sentiment, I edge punched it and added a length of ribbon before adhering it to the base panels. I attached the little glassine bag using my ATG and the ribbon doubles as a pretty embellishment, but also helps hold the bag in place. I added adhesive to only half of my punched circle layer so that I could filled down the top of the bag and tuck it behind the top half of the punched circle to keep it closed. I can add a little hand written note on the back or leave it just like it is, either way, I'm thinking the recipient is going to love it!
 
Thanks for stopping by!


Wednesday, January 30, 2013

heart treat box

Last Friday the uber talented and DeNami DT member, Dana, showed us an adorable little heart treat box she whiped up. Her tutorial was great and really made me want to play with that cute little heart shaped box. DeNami is offering it up the template FREE...can't go wrong there, can we ladies?
 
 
I downloaded it and printed it out on cardstock....that's where I ran into trouble. I cut out my pieces and just stared at them. I had such a hard time deciding what to do with them! In the end, I treated them like a blank card front and just stamped a little scene and added embellishments. I started by distressing the hearts with a little light pink ink and the base & handle with grey ink. I punched the holes and added little green brads to 3 side panels and pink to the front panel.
 
For the front I stamped the teeny heart background then added grey, pink & green washi, a green heart and layered a grey and white scalloped circle with the ohh so adorable new Cupid Chickie. And you know me, Icouldn't NOT add ribbon, lol!


For the other 3 sides I stamped the heart flower trio and the new grass border along with the teeny heart randomly "sprinkled" on.

After glueing it all together I added wire and curled the ends for a finished look. As you can see, I didn't fill mine with candy. I added some pretty DeNami multi colored iridescent shreds then piled in some other wonderful DeNami products...Washi Tape, buttons & twine. I wouldn't mind not getting chocolates and flowers with those kind of goodies in MY treat box ;)


Thanks for stopping by!


Tuesday, January 29, 2013

Chalkboard Love

Not so long ago our fearless leader, Paulina, introduced us to a new and very cool trend over on the DeNami blog. She made what's chalked a "chalkboard" card. This technique is so fun and cute! I just couldn't wait to try it out...
I couldn't believe how easy this was to do....
  1. fold a piece of colored cardstock of your choice for an A2 sized card base
  2. cut a piece of black cardstock to your desired panel size
  3. stamp your image using Versa Mark and heat emboss with white embossing powder
  4.  using a sponge wedge, cotton ball or other distressing tool, swipe white ink all over black cardstock making sure to swipe heavier in embossed image area. 
  5. finish embellishing as desired and adhere to card base
Paulina did hers just a little differently, she used a white colored pencil for her white highlights so she had a little more control over the "chalked" areas. I think both ways of doing it turned out pretty dang cute! I decided I wanted my sentiment to take center stage so I added a couple of "flags" and a button to complete my card. This new Love sentiment makes me smile...it's just so pretty! Why don't you give it a try? If you do, let me know, I'd LOVE to see your creation! 

Monday, January 28, 2013

Tips & Trick - January 2013


Welcome to the Wonderful World Of Washi

Today I want to talk about this little item that has taken the crafting world by storm. Not so long ago (just a few weeks ago actually) I was asking, "What exactly is Washi Tape and how the heck do I even use it?" I was mystified for sure. I had purchased some from DeNami way back in November of last year. I sat it on my desk, I looked at it and even ohh and ahhh'd at it's prettiness once in a while. However, I never touched it. :/   I was just intimidated and not quite sure what to do with it. So there it sat, staring at me, daring me and even giving me the stink eye on occasions. Yeah, I've seen it all over Pinterest and have seen beautiful cards where someone has torn off a few uneven strips, attached them to a card base and stamped a sentiment to make a lovely finished card. I didn't even try to kid myself, I knew I couldn't pull off something like that even if I tried. lol!


So what the heck is Washi................

Definition according to Wiki:
Washi (和紙?) is a style of paper that was first made in Japan. Washi is commonly made using fibers from the bark of the gampi tree, the mitsumata shrub (Edgeworthia chrysantha), or the paper mulberry, but also can be made using bamboo, hemp, rice, and wheat. Washi comes from wa meaning Japanese and shi meaning paper, and the term is used to describe paper made by hand in the traditional manner.[1]
Washi is generally tougher than ordinary paper made from wood pulp, and is used in many traditional arts. Origami, Shodo, and Ukiyo-e were all produced using washi. Washi was also used to make various everyday goods like clothes, household goods, and toys as well as vestments and ritual objects for Shinto priests and statues of Buddha. It was even used to make wreaths that were given to winners in the 1998 Winter Paralympics. Several kinds of washi, referred to collectively as Japanese tissue, are used in the conservation and mending of books. Washi has also found a new form, as a tape, usually combined with acrylic glue. It is similar to masking tape in that it is removable from most surfaces.

Okay, now we know it's paper and tape all rolled into one, but what the heck do we do with it......

Ahhh, now that's the million dollar question, isn't it? Well, thanks to the Wonderful Washi blog hop DeNami was hosting, I had no choice but to figure it out! I tore off a piece, looked it over, stuck it on paper, peeled it up and all of the sudden my mind went into overdrive...I had ideas flowing right and left! I not only made the little candle with matching card I showed for the hop, I made a few more cards, the cute treat box I showed you in my new, monthly project feature and these neat little things....

I had an old iPhone case that was kinda ugly. With a little Washi, it's gotten a new life. To make the flowers, I simply placed Washi on scrap paper, ran it through my die cut machine, peeled it up and placed it on the phone case. Then added a little gem stone using Crystal Lacquer for the flower center.
And I figured why stop there! I jazzed up my charger while I was at it...
Admit it, you've ran out of chip clips and have grabbed for the old standby...clothes pin. What about dressing them up a bit? Add a little Washi (I would have painted the clothes pin white, but didn't have time) and now you have a cute little gift!
Don't you just hate it when you're putting on those little finishing touches that make your card just pop with perfectness only to find out you don't have something that matches? A little Washi covered button is just the thing you need!
From bags, tags, boxes, and more, you can embellish just about anything with Washi Tape. Seriously, I could go on and on and on about the ideas running through my head to use Washi Tape on. Don't be scared of Washi, and certainly don't let it sit there giving you the stink eye. Pick it up, play with it...bettin you come up with something darling!

*little hint: if your Washi is too wide, simply adhere it to a piece of cardstock and cut to desired width using your paper trimmer. Peel it up and you're good to go ;)

If you didn't get a chance to follow the Wonderful Washi blog hop, here's the link to the list of participants. There's some WONDERFUL Washi eye candy to behold! I've decided to share my newly found love of Washi with all of you, so leave me a comment on this post by February 2nd and I'll draw a random winner for 2 rolls (of your choice) of Washi from DeNami!And don't forget to stop by the DeNami blog today,  DT member, Emily, is debuting a brand new feature that involves what else...WASHI! There's also a little give a way on her blog too, My Little Slice of Bliss!

Thanks for stopping by!

Friday, January 25, 2013

Craft Dashes & Birthdays

Ohh my goodness, I can not begin to tell you how excited I am!! I'm feeling loads better, not 100%, but BETTER and on my way. With my physical health improving, I've been able to get busy and made LOADS of fun Valentines Day cards for you, so many in fact that you are going to have to put up with "bonus posts" until Valentines Day is over. So for the next couple of weeks look for posts on Tuesday's & Thursdays ;)   I've also managed to create a little something for a challenge too. Gosh, I can't remember the last time I was able to enter a challenge...it's been MONTHS! :(   I hope to be able to get back into the groove soon, but for right now I'm going to take it easy and limit myself.
 
Did you get a chance to watch my very first start to finish card tutorial in Wednesday's post? I was way nervous. Making a tutorial is one thing, but a video...ohh my! Well, hope you liked it and I think I'll be trying my hand at that again soon.
 
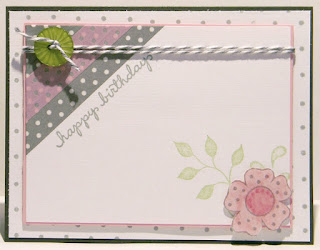
Well, this post has gotten to be a novel so I better just get to the challenge info and the card! ;)  I needed to make a birthday card for my Mom and I thought to combine it with the fun challenge over on Pretty Pink Posh....

Here's my creation....

Before starting, I doodled my idea on a piece of scrap, pulled out a few items and stamped / fussy cut my flower. I didn't color the flower until the timer started ;)

What my desk looked liked when all was said and done, lol.

And my finished card, in 9 minutes, 43 seconds :)
I wanted to make polka dots in the upper corner and thought about stamping them but when I was doodling my design out I realized that Washi would be perfect. I used 3 strips of grey washi and then overlayed a piece of pink in the middle. Gotta love that stuff! I hadn't pre planned on it, but ended up raising the main focal panel up on foam tape and I also used foam tape to attach my flower (lost time pulling out the foam tape...jeeze). I love everything about this little creation...polka dots, new DeNami images and Washi (that has polka dots!!). Hmm, thinking this would make a better card for me than my mom, lol! ;)
 
That's it for me today, I'll see you on Monday with a very informative Tips & Tricks post on a product that's taken over the crafty world. I'll be talking about the product and it's many uses and have many pictures of what I've done with it. There's even going to be a small give-a-way! Thanks for stopping by!!
 

Wednesday, January 23, 2013

Valentines Day Card video

Do you remember how I announced in the last "DeNami Happenings" feature that I had some fun things planned for the Addict blog? Well, start to finish card videos is one of them. While I had a couple of "hiccups", I hope you enjoy it.

With Valentines Day right around the corner I thought I'd take the opportunity to show you an easy peasy start to finish Valentines Day card that doesn't take much time at all to whip up.

Cardstock measurements:
Chocolate - 5 1/2" X 8 1/2"
White - 4" X 5 1/4" & 2 1/2" X 5"
Red - 3 1/2" X 5 1/4"
Pink - 2 3/4" X 5 1/4"

Supplies used (with links to the DeNami web site):
F231 Love Flourish
A91 Teeny Heart
N134 Teeny Heart Background
PC21 White Cards
PC32 Chocolate Brown Cards
PC48 Petal Pink Cards
PC16 Red Cards
RB-7317 Chocolate Brown Grosgrain Ribbon (3/8")
SS07 Strawberry Freeze Glitter
GL01 Quickie Glue Pen

Weather it's a layout I've done in the past that you're interested in or a particulair stamp you'd like to see used in a future video, just let me know! Hope you liked my little start to finish card video and I hope to make it a regular feature here on the Addict blog!

Thanks for stopping by!

Monday, January 21, 2013

Tool talk... January 2013

Hi everyone! I'm excited today :)  Today I'm debuting a brand new blog feature and as you can see by the post title, it's about tools. As I perused the isles in one of the big box crafty stores I took notice of the myriad of tools now available to crafters like us. How in the world are we supposed to know what they all do or which ones other crafters love or don't love. I know I've bought a few that just weren't worth a darn but then I have a few that you'd have to pry from my cold dead hand to get it from me, lol! It really had me thinking about what tools other crafters find invaluable. From all of that thinking, my teeny brain got tired ;) and a new blog feature was born. I thought you'd like this to be a monthly segment and have enlisted a few crafty gals  (that we all know & love) to show us what tools they love too!

I sat at my desk and gave it a lot of thought. I asked myself  "what tool do I use consistently and could not live without". This little tool is one that I tend to reach for time and time again...
My favorite tool is the Quickstick by Quickutz. 
This one little tool has so many uses...


It has an angled flat end that is perfect to break loose gemstones and the tacky end is great for picking them up to place on your project. It's also perfect for those tiny little pieces of cardstock for paper piecing and the flat end helps line it up perfectly. I used to use my fingernail but you still can't see very well with your hand in the way, this tool lets me see everything so I get it right the first time.

Since it's round, it's great for making wire curls or to curl ribbons. If you have thin cardstock, the pointed end is great for making a little hole for brads or to string twine through.

I'd love to hear your thoughts on the concept of this segment and feel free to ask any questions about this little tool...I'll be happy to answer them :)   Thanks for stopping by!


Friday, January 18, 2013

Youre a tweetie

I just LOVE these cute little chickies! I purchased this stamp last year and used it quite a bit.


It's a larger image and has it's own sentiment already attached so it makes a great focal point. Just stamp a little background like I did here or use some pretty patterned papers then simply add your image panel. DeNami has done all the hard work for us with little cutie. :)  All I had to do was a little coloring, added glitter to my chickies and some crystal lacquer to the hearts. I can't wait to sent this to someone special!


Thanks for stopping by!

Wednesday, January 16, 2013

The Project Corner - DeNami take out treat box

Hi everyone! Do you like to make projects? I have to admit that I'm a little intimidated by them and well, just a little lazy. Projects seem to take a lot of patience and effort. I decided that I needed to step out of my comfort zone a little this year and have challenged myself to do several things...one being, more projects!! I thought that I'd share my little projects with all of you in a little monthly segment. Some will be easy, like today's, and some will be a little more involved, but all will be using the wonderful DeNami stamp images and/or products. Whatcha think, good idea? Be sure to leave me a comment letting me know your thoughts :)

My first little project to share with you is a little treat box. I purchased a plain white Chinese takeout box from my local craft store then added a little DeNami love and my own twist to it. They're easy to take apart and lay flat so that you can stamp on them. I opened mine up and stamped the teeny heart background then reassembled it again. I layered on a pretty doily and some pink striped washi from DeNami. I gave it the illusion of layers by adding a strip of DeNami iridescent strawberry freeze & iridescent blue ice papers. I had some random ribbon  and die cuts that I added and finished it all off with a little bow, a Prima rose (I used a copic marker to add a blush of pink color) and 2 heart buttons. I can't wait to fill this with little goodies and send it to someone special!


I just love making my own bags and treat boxes. When making boxes and bags, the creativity is endless. You can use rubber stamps, ribbons, buttons, card stocks, patterned papers, LOADS of embellishments...seriously, sky's the limit!! Don't let them intimidate you, just think of them as miniture cards that you can fill up with yummy goodness, lol. ;)
Here are a few links to other boxes & bags I've made...
Don't forget, there are LOTS of ideas on the DeNami website too :)
Thanks for stopping by!

Monday, January 14, 2013

Squirrely love

If you're looking for my Wonder Washi blog post for the hop, please click here or go one post down...thanks!

Ohh my goodness, have you checked out the new release from DeNami yet? *GASP* Too awesome for words :)  All of the images Nami has drawn are amazing. She's really outdone herself this time! I received my order this past Saturday and dropped everything just to play with my new goodies! 

I just couldn't wait to make my first card. I was going through my box of goodies trying to decide which stamp to use first and the little squirrel kept calling my name...boy does he ever make me smile :)


I started off with a white card base and stamped the teeny heart background then layered on some kraft and iridescent strawberry freeze card stocks with a little pink striped Washi. For my little scene, I stamped the P93 large winter tree then added the A90 teeny heart and leaves from the PF37 elegant floral set. To finish it all off I added the little squirrel,  heart shaped acorns and the sentiment from the new PF56 nuts about you petit four set. This little card truly is adorable in person, wish ya'll could see it!

That's it for me today, thanks for stopping by!


Sunday, January 13, 2013

Wonderful Washi Blog Hop

Hi everyone! Today's post is kind of a "two-fer" if you will.  Not only is this another wonderful blog hop hosted by DeNami Design, but it's also some seriously fun ideas for using Washi tape! So if you've ever wanted to know what the heck to do with it (like me not so long ago) or if you're just looking for new ideas, you've come to the right place. The ladies in this hop are sure to have some wonderful inspiration for you!
DeNami January Blog Hop
When: The blog hop starts on January 13th at 6 AM, PST. However, you have until January 14, 2013, 11:59 pm PST, to leave comments on all the blogs (to be eligible for a prize).
Why: To be inspired by fun DeNami Design creations and also the chance to win mini shopping sprees on the DeNami Design website!
Prizes: We are giving away THREE $20 gift certificates to our website! We'll be giving away one gift certificate to a random participant (DT members not eligible) and then we'll also be giving away TWO gift certificates to TWO people who comment along the hop!
You should have arrived here from one of newest DeNami DT members, Tammy Hobbs. I'm betting that she had some great eyecandy for you didn't she? If you didn't get here from there, no biggie, you can go back to the DeNami blog for a full list of participants to get right back on track

I came up with a little cream, black & red card and candle combo...
 For my card I simply ran 2 strips of Washi tape up the side of the card and then layered on a piece of double sided tape and sprinkled on silver glitter. I stamped out the water lily on red and charcoal cardstocks then fussy cut the pieces I needed to make a two-toned flower for my little panel. I just LOVE Pinterest and fell in love with the darling glittered candles on there and thought that I could make one, but with my own spin on it of course. I started off with running a strip of Washi tape around the bottom then ran a strip of double sided tape right above the Washi and sprinkled on the silver glitter. I added the ribbon and a fussy cut water lily to finish it all off. My only issues...the glitter was a little hard to get off of the candle itself - I ended up having to use a damp cloth to wipe it off and I dropped the candle so now it has a nice little dent, lol. Ohh well, thinking who ever I give it to will still like it, dent and all ;)
 That's it for me today, now off you go to visit with the very talented Lisa Petrella.  I can't wait to see what she has in store for us! Have a great day :)


Friday, January 11, 2013

A little DeNami Haul

Hi everyone :)  Are you ready for the weekend to start? I know I sure am and for two reasons. One, I get to rest and maybe sleep in till at least 6am and second, the DeNami "wonderful washi" hop starts on Sunday morning :)  I'm super excited to see what everyone's created (little hint: I have a card & project). I hope to see you here on Sunday (you have till Monday night to leave your comments to be eligible for a prize).

First off, before we get to today's post/video, I must apologize to you. I should have made this video 2 months ago, but unfortunately I've been struggling with some physical issues that have prevented me from doing a lot of things including limiting my card making. I didn't manage to get as many Halloween, Thanksgiving and Christmas cards made for you as I would have liked. I hope I was still able to bring you a little inspiration in spite of that. After many Doctors, tests and now Physical Therapy, I'm on the mend. Monday at my PT appointment I was told part of my "homework" was to craft for 2 hours on Tuesday...the Dragon Lady didn't have to tell me twice!! Yes, I seriously call her that, she doesn't mind being called names and it's fitting since she's made me cry on several occasions. ;) PT is not easy nor pretty! Two hours of pure torture twice a week = OUCH to the MAX! And yes, I have let little four letter word slip on occasion. The Dragon Lady just stands there and laughs at me and says to keep going....sigh. She scares the crap out of me (insert nervous laughter)!

Well, with all of that out of the way, let's get on with the fun stuff shall we? Do you remember last November when DeNami put the WHOLE STORE on sale? I purchased like a mad woman, lol! I scratched quite a few things off my wish list....
I also took the opportunity to stock up on my must haves like cardstock and spools of grosgrain ribbon. I spared you the cardstock and ribbon in the video, but I do LOVE the quality that DeNami carries. They have almost every color I could possibly want and I hate to have to buy other brands. Hope you give it a try someday :)

That's it for me today. I hope you're able to hop along in the blog hop that starts Sunday morning. Don't forget to leave comments on everyone's blog for the best chance to win a wonderful DeNami gift certificate. With their new release that just went on sale I'm betting a gift certificate would come in handy!! If you want to participate, just go to the DeNami blog on Sunday to find the full list of blogs to visit and hop along. See you later!

Wednesday, January 9, 2013

elegant sympathy card

My best friend recently lost her mother after a long illness. While I saw her and talked with her and expressed my sorrow, I felt that I needed to make a card for her also. Words can never express how I feel when someone I care about hurts so much. It tears at my heart to know the sorrow they are going through and if there was something I could do to help them I would gladly do it. Unfortunately I know from experience that nothing anyone can say helps the hurt we feel at the loss in our lives but hopefully sending them a little card will let them know that they are on your mind and in your heart.
 
 For this card I raised (with foam tape) an embossed cream panel on a cream card base. I added a few black accents to make it pop.
After her days have stopped running together and her thoughts are clearer she will realize how her friends gathered around her and comforted her. I'm sure she will appreciate this card and all of the others she has received. A card is a small gesture, but trust me, it means the world to someone when they are grieving.
That's it for me today...thanks so much for stopping by!!

Monday, January 7, 2013

DeNami Happenings - Jan 2013


Wow, can you believe we are starting 2013? Where the heck did 2012 go to...seems like it flew by for me. There were so many changes in 2012 that have reaffirmed my faith in the Lord, taught me life lessons and helped me shine. I am truly thankful for everyone that was along for the ride. I can only hope that 2013 is just as good to me, my family and to all of you.

Now I don't want to spill the beans quite yet on everything I'd like to bring to the blog, but one of my ideas is more videos, ya'll have spoken and I'm listening. I'm starting to get over a little of my nervousness now that I have a couple of haul videos and a tips & tricks video under my belt, so you can look forward to me trying my hand out on start to finish card videos soon. Also, I have a couple of guests lined up for a fun new and informative segment. Hopefully you will like everything I have in mind! I'm also very open to your ideas and if there is ever anything you'd like to see or not see anymore, just drop me a note at DenamiAddict@yahoo.com. Your opinions really do matter!!

The big news for January is that DeNami is releasing new images!!! *doing a happy dance*
Now, if you are "friends" with DeNami on Facebook, you got a tiny sneak peek at a couple of the new chickies & images and boy are they ever ADORABLE!!! Flower Chickies and Gardening Chickie...what's not to puffy heart love?? Then the cowboy chickie...OHH MY GOSH!!! Paulina will be starting the introduction to the new line right away on the DeNami blog and boy ohh boy am I excited!!

More big news from DeNami is the announcement of the 2013 Spring / Summer design team. They have welcomed back some very talented ladies and have also introduced 2 new ladies that some of you may be familiar with already. They both are super fun and have a lot to bring to the table with their wonderful styles and talent.

A couple of months ago DeNami started carrying Washi tape. Have you ever used Washi tape? If not, you are in for a real treat when you do!  I used Washi for the firs time on a Christmas package project and am SERIOUSLY hooked. If you need a few ideas on how to use Washi tape you are gonna be excited about the DeNami hop that's coming up....

DeNami January Blog Hop
There are sure to be a lot of stunning designs and ideas to get you started on using this FAB product!


That's it for me today. I'm off to my crafty area where I'm working on Valentines Day inspiration for you gals. Thanks for stopping by!!