Friday, June 28, 2013

Bold & Bright: Thinking of you

Happy Friday...FINALLY!!!! I didn't think this week was ever going to end...sigh.
 
There's only a couple of days left and I want to squeak in a 2nd entry for the Paper Sweeties sketch challenge.
What a fun and versatile sketch!! Thinking I'll add this cutie to my list of go-to faves :)

I knew right off that I wanted to make the vertical panels on the sketch using my mucho loved DeNami chevron border and that I wanted to use a bold sentiment (psst...it's on sale!) that would draw your eye. However, the rest of the card was kind of trial and error. I wanted to include something from Paper Sweeties of course so I looked through my ever growing stash and saw the cute little flag in the Fun Shapes set and knew that it would be perfect! I was browsing through my ink pads trying to come up with a color scheme when I decided to again go bold and pulled out the purple / turquoise color combo I used on this card for the blog hop a couple of weeks ago. Let me tell ya, I was way worried about ya'lls reaction to that color combo but you gals are so awesome and said such sweet things about it...thank you :)
 
Here's my little card...
 
I never do this, but I'm going to have to pat myself on the back for this little creation. I'm totally feeling it. The colors are bold & bright and really lend themselves to the bold chevron and sentiment. Then you have such a contrast from adding the flags with that tiny little sweet design...It all just makes the card "pop". I hope you like it as much as I do!!
 
I'll see you back here Monday with the DeNami Addict newsletter. There's going to be a lot going on for the month of July!!!


Tuesday, June 25, 2013

A quiet summer day...

Blogger note: HAHAHA, I messed up the posting date...it's only Tuesday! I ment to schedule this for Wednesday...oops! ;) 

Happy Wednesday everyone!! We're half way there...the weekend is in sight....sigh! Did you get a chance to catch my photo tutorial on the paper clay candle wrap?? I can't beleive how easy it is! I'm pretty lazy and tend to stay away from anything that's even a little hard. These are a perfect little project for me and I can't wait to make more!
 
Today I have a pretty little card to share with you that I'm entering into the 10 Minute Craft Dash over on the Pretty Pink Posh blog! This weeks colors are pink, tangerine and grey.

Here's my starting and finishing pics...boy do I make a mess when it comes to this challenge!! My card was created in 8 minutes & 23 seconds.

 
 This little card makes me think of a pretty little summer afternoon with nothing on my mind but just pure enjoyment in the moment. I like to stamp in grey a lot since it's less harsh than using black and this bicycle stamp was tailor made for being stamped with grey ink. It's so soft, feminine and pretty.
 
Well that's all for me today, hope you've enjoyed my little card and I'll see you back here on Friday with a little creation I've made for the current Paper Sweeties sketch challenge!!


Monday, June 24, 2013

Project Corner - candle wrap

Wow, it feels like it's been forever since I've done a tutorial! All of those theme weeks I did really kicked my tushie!! I just wish Mother's Day, Graduations, Weddings, Father's Day & Independence Day were a little further apart from each other!! ;) It's been a whirl wind for me behind the scenes, but ya'll are worth it!

A few years ago there was a crafty show on HGTV that I loved. A gal went around the US visiting crafters like you and I and filmed them doing what they do. One gal they showed used a medium called Paper Clay. This really intrigued me and I made a little mental note of it. Well, like most of my mental notes...I lost it, lol. I recently caught a re-run of the show and there it was...paper clay!! After a little research I found out that it is what it says it it. It's clay with paper fibers added. Now the strange part is, is that air dried paper clay is strong and if you fire it like traditional clay, it weakens. Weird hunh?? I also found out that paper clay is readily available at the big box craft stores and is fairly inexpensive. That's a win-win isn't it?? It cost me more for a little plastic rolling pin than it did for a package of clay....sigh.
 
While the paper clay can be made into just about anything you can imagine, I decided on a little fancy dressing for some dollar store candles....
Needed items:
  1. paper clay
  2. roller
  3. copy paper (1 sheet)
  4. waxed paper
  5. knife
  6. paper cutter
  7. straw
  8. ink pads
  9. q-tips
  10. ruler
  11. rubber stamps (leaf accent set, elegant floral set, single pansy, pansy border, pansy sprig
Measure your candle and cut a piece of copy paper to the desired size making sure it's at least one inch shorter than your candles circumference (you don't want it meeting end to end). Stamping out your design on this template will give you a good idea as to how it will look on the candle.
 
Roll out some paper clay to your desired thickness and then using your template & knife, cut out the candle wrap
  
 photo step4.jpg
Using your template as your pattern, stamp your design into the paper clay. I found a medium pressure gave me the perfect impression depth. (The clay is very forgiving and can be re-rolled out if you make a mistake)


 photo step5.jpg
Using the straw, "punch" a hole in each end of the candle wrap for adding ribbon later. Using the q-tips and your ink pads, dab color on your pattern as desired.

 photo step6.jpg
Carefully pick up your finished clay and wrap around the candle for drying. (I learned by trial and error that as the clay dries it will slide down the candle, so it's safer to just place it at the bottom)

 photo step7.jpg
After drying for approximately 3 days you can remove it from the candle and add your ribbon.

 
 photo collage1.jpg
By dabbing the ink on with the q-tips I achieved a soft / shadowed look that I was going for.


I've also made a little candle wrap using 2 alternate ways of coloring it...
 

 photo collage3.jpg

For this one, after stamping my design I simply sponged on Tim Holts distressed Tea Dye ink (stamp: Solid Decorative Crest)

 photo collage2.jpg

I just love how vibrant this one turned out!! After I stamped it I left it uncolored to dry. After it was fully dry (3 days) I simply colored it in using my normal markers. This cutie is totally my fave by far!! (Stamps: Small Daisy, Elegant Floral set, Garden Accent set, Mini Butterfly)


I hope you give this a try, it was fun and would make an awesome personalized gift....can't you picture a little frame with a monogram in it?? I can see the frame colored gold with black lettering or maybe just done in a classic black & white motif...Cute, cute cute!! And don't forget about your dry embossing folders...they could be easily pressed into the clay for some yummy teatures...ADORABLE! Hmmm, thinking I'm going to try these ideas out right away! Like I said, the possibilities are endless :)

Well that's it for me today. What a long post, thanks so much for sticking with me through all of that!! ;)

Friday, June 21, 2013

Rocket Man....

Hello everyone and welcome to the last day of 4th of July inspiration week! I totally have Elton John's Rocket Man song stuck in my head, hehehe!! I'll refrain from singing and you can thank me later for that! My Daddy always said I couldn't carry a tune in a bucket...but hey, I never let that stop me!! ;)

I saved my favorite creation for last....
I made my own little chickie by using the Fuzzy Ball and a little face from the Animal Faces petit four set and I added a little hat from the new Everyday Hat set too...how cute is he?!? Does the Rocketship he's riding look a little familiar?? It's the DeNami Rocketship, but it was way too small for my Fuzzy Ball so I stamped it then copied it at 100% enlargement on my home printer/copier. A little fussy cutting & coloring later....a chickie on a rocket! After coloring the rocket I ran into the issue of not having any card stock or patterned paper that matched it. I did however have an ink pad that did so I did what I do best....I made a background (and the little strip with the stripes too)!! The stripes are actually DeNami's Blue Washi and for the background I sponged the blue ink onto white cardstock then using the same ink pad stamped the Brushed Stars. To fill it in a little I stamped the Teeny Star in red and yellow.
 
With all of these themed weeks we have been way off schedule. Ill be back to normal posting next week and have decided to start the week off with a fun little tutorial so make sure to check back in bright and early Monday morning!!

Well that's it for me today! I hope ya'll have a great weekend :) I'm going to be busy playing with my stamps for some fun floral and summer creations that hopefully bring a smile to your faces!

Thursday, June 20, 2013

Stars and Polka Dots??

I know the ole saying is Stars & Stripes, but this little creation is all stars & polka dotted goodness, lol!

For today's card I feel like I went back to my roots so to say. All of the elements of this card just scream "me". I created my own patterned paper, have a pretty little punched edge, lots of layers and of course a pretty little fluffy bow / button combo. Yup, there's a lot of me in this one :)
 

If I redid this card I think I'd have to make a small change to my popped up panel. First off I'd make it a little smaller, it's just too large. I'd make it small enough that it would fit nicely on the top portion of the card instead of coming down over the red polka dots too. And second I'd add a layer of red between the white and Navy panels. Yup, thinking that would look so much better! I liked it well enough when I made it. I also liked it when I edited my picture, but now....not so much. :(   Easy enough to change up and make adorable though!!

That's all for today, I'll be back here tomorrow with my final 4th of July inspiration card! It's adorable and involves a little home made chickie ;)  you won't want to miss it!

Wednesday, June 19, 2013

God Bless America

Well hello and Happy Wednesday to you! Are you ready for another little patriotic card this morning??

Right off the bat let me tell ya'll that I totally cheated with this card...it's from last year. I just really like it and couldn't resist bringing it out of retirement. ;)
 
When I made this little card I had decided to reverse what I would normally do. I used the sentiment as my background and the sparkles as my focal point. It's really fun to use your sentiments in different ways. Did you by chance see my Tips & Tricks post on different ways to use your sentiments, it's well worth checking out.
 
That's it for me today, I'll see you back here tomorrow with another fun 4th of July card!!

Tuesday, June 18, 2013

Stars, Stripes & Flags (plus a little award)

Ohh my goodness, I was nominated for a little blog award by Deb from My Craftroom Creations!!! It's called the Liebster Award. Since I've never heard of this and had no idea what it ment, I spent a little one on one time with Google. After reading a ton of usless facts and sifting through the "kitty litter" I found out that it's origens are from Germany and the word "liebster" meand "nice". So basically I got an award for having a nice blog :)  Well that's something to be proud of isn't it?? Heck, who am I kidding, I'm just happy to have been noticed by at least one person and thought of!
The rules are that this award is to be passed along from blogger to blogger, and the bloggers it's passed to has to have less than 200 followers. So I pass it along to 5 bloggers with less than 200 followers that I think are nice and deserve a little shout out then go to their blogs to let them know I passed the award onto them. Now when I was researching this little award I found out that back in it's original origins you were not only to pass it on, but to list a few random facts about yourself so that people could get to know you a little. I happen to love that idea and am sorry that it got lost along the way. I think it ought to be revived but the people I nominate shouldn't feel like they have to do it....

Random facts about me:
  1. I'm seriously addicted to Pinterest
  2. I check my Facebook WAY to often and think I need a 12 step program for it
  3. I'd rather text than talk on the phone because I'm constantly multi tasking and just can't manage that while talking
  4. Am seriously humbled every time someone leaves me a comment or "pins" one of my creations
  5. I tend to listen to the radio/iTunes way to loud and sing (if you can call it that, lol!) just as loud
Alright then, how about the 5 blogs that I nominate because I think the ladies are fab and work hard bringing a smile to our faces??
  1. Amy S from Standing Ovation. I've gotten to know her quite well through blogging & her love of DeNami (she's a true addict too!!). She always has a smile and is quick with a kind word.
  2. Wendy E from the Created By Wendy blog. I can not tell you how much inspiration I get from the talented gal. She is uber sweet and talented!!
  3. Linda from the Simple And Joyful Thoughts blog. How can you not love someone that loves DeNami?? ;)  But seriously though, Linda is so kind and I look forward to seeing what she creates for the DeNami blog hops!!
  4. Heidi H from Stamping, Knitting, Etc. What a sweet gal and wow, she has such and knack for creating fab cards! She's another gal I look forward to visiting a lot and gathering inspiration from.
  5. Jo from Jo's Scrap Shack. There's always A LOT going on over on Jo's blog! Inspiration, challenges, giveaways, shopping...I have no clue how she keeps up with it all...I'm in awe!!
I must say that there were so many blog that I think deserve this little award even though they have over 200 followers.

That's all my rambling for today on this subject ;) How about we get on with today's post since that's what you came here for??

 
Hi everyone!! Are you ready for a week of fun patriotic cards?? With the 4th of July creeping up on us; just a mere 15 days away) I thought I'd bring you a few creation that I've made. I was going to wait until next week, but changed my mind because if your a procrastinator like I can sometimes be, you need a little extra time to get yours made!! ;)
 
To start this week off, I decided to pull out some patterned papers and make something fairly easy yet kind of classy...
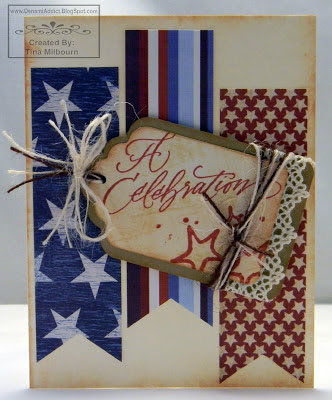
I started off with a cream card base that I distressed with some ink and a little make-up sponge. I cut the flags from patterned papers and adhered them to the base card. Then I punched a kraft & cream tag from 2 sizes of Marvy tag punches and distressed them with the same ink I used on the card base. I lucked out with the Momento Rhubarb ink matching the rusty maroon color in my patterned papers perfectly so I stamped the sentiment and brushed stars using that. I added some lace and fibers then popped it up on foam tape. This little card was easy peasy and I can make a ton of them quickly and with not much paper.
 
Blogger Note: If you own the "A Celebration" sentiment, you know that it's a long sentiment, not stacked the way I have it. I have a little tutorial on how I mask my sentiments to change them up to fit my cards.
 
I'll see you back here tomorrow with another fun 4th of July card that uses a sentiment in a whole different way!
 

Monday, June 17, 2013

Tool Talk - June 2013

Hi everyone and welcome to another episode of Tool Talk!! This is where we crafters introduce each other to our favorite crafty items. Today we are lucky enough to have Amy S. (a personal friend and amazingly sweet person) joining us to talk about her favorite tool. She's super fab and I look forward to seeing her stunning creations every month during the DeNami blog hops. Did you catch the one last week...OMG, her card blew me away!! She is a wiz with ribbon too...I call her the Queen of Ribbon Treatments. She's always coming up with something to knock my socks off! Well let's get started shall we??
 
Hello everyone, I’m Amy from the Standing Ovation blog.  I just LOVE reading about other bloggers’ favorite tools, and I feel truly honored to be involved.  However, when I agreed, I didn’t realize how hard it would be to decide on which tool to discuss!  I have so many favorite crafty items!  I could have so easily talked about my favorite adhesives or embellishments (ribbon…Copics…Stickles…), but I had to stop myself and think, “What do you use on EVERY project?”  Well, that was easy!  I use my favorite scissors on EVERY SINGLE THING I make!  So, allow me to introduce you to…

Tim Holtz Tonic Scissors

 
To be honest, the first time I saw these scissors, I wouldn’t touch them.  I used to work in a papercrafting store, and I avoided those scissors like the plague.  They looked awkward, and while I respect Tim Holtz, I am not one who jumps to buy everything with his name on it.  However, one day, I was working on a project, and I couldn’t find any other scissors to use, so I had no choice but to use them.  *cue the choir of angels*  I’ve been in love ever since.  These are the best scissors EVER!  They are incredibly comfortable to use, and I have large hands and big ol’ fingers.  Plus, they cut like a dream!  Truly effortless!  They have non-stick, micro serrated blades, and they are very easy to control.  They cut everything perfectly from paper to ribbon and even sticky things that normally are difficult with scissors.  They feature a moderate precision tip.  For most of my fussy cutting needs, these work just great!  However, if you do need an extremely fine tip, I do recommend Cutter Bee by EK Success.  Those have a super duper precision tip, but they are not nearly as comfy to use as my Tim Holtz Scissors. 

Here is a comparison between the tips of both scissors (Cutter Bee on the left and Tim Holtz Tonic on the right):
 
 
Every crafter needs a good cutter, good adhesives, and good scissors.  These Tim Holtz Tonic Scissors get my vote EVERY TIME.   I’ve had mine for years, and they are still sharp, clean, and comfy!  Here are some pictures of me fussy cutting a squirmy little DeNami Design Octopus:


TADAA!  Super easy!


These scissors also work so well with ribbon!


Get clean, crisp cuts every time!


These scissors retail for $12-15, which may seem like a lot for a pair of scissors, but you will NOT be disappointed.  I’ve suggested these scissors to family members, friends, and random strangers, and they unanimously report back that they LOVE them!  So, grab yourself a pair and enjoy the ease and comfort of cutting with the Tim Holtz Tonic Scissors!
 

I'd like to thank Amy for joining us here on Tool Talk, she's uber sweet :)
 
I must say, I do LOVE these scissors myself! When I first saw them I was thrown off because they have a tiny serration on one edge. I thought they'd leave my paper all jacked up. But after hearing so many good things about them I just had to try them out. I purchased mine at a big box store using one of their frequent 40% off coupons. Now I'm asking myself why I didn't try a pair sooner...LOVE them! They are also amazing at cutting the little loops off of the backs of buttons ;)    Tough, non-stick, and don't let the giant handle fool ya, because they are pretty comfortable too! They are a winner all the way around in my book and Amy's too, lol!
 
Thanks for joining me here on Tool Talk. If you want a refresher of the past Tool Talks they are listed under the Tutorials & Tips tab at the top of the page. Also, I still have 2 months still open if you'd like to tell us about your favorite tool!
 

Saturday, June 15, 2013

A celebration of Love

Hi everyone, how are you doing this beautiful Saturday?? I know I generally don't post on Saturdays but I had made this little card and really was on the fence about showing to ya'll, but in the end I was just so excited about the way it turned out that I couldn't not share it. The reason I was on the fence is because it does not include anything DeNami. *GASP*!  I know, I'm still in a little bit of shock myself  :/  eeek-gads!

Yes, lol, it is another wedding card....told ya I was on a roll and enjoying this theme!!


Ohh wait, there IS some DeNami love in this pretty little creation; black and cream cardstock! Sigh...I just puffy heart the quality of some DeNami cardstock and am totally having a meltdown over them discontinuing the line (insert much crying here). However, I did stock up at the discounted price so if you want some now is the time since it's all (except white) on clearance.
The stamps I used are from the latest release from Paper Sweeties. I used the couple and sentiment from the Wedding Day set and the fancy little frame from the Best Wishes set. The hand dyed binding came from Paper Sweeties also.
Well, that's all for me today, I will see you back here on Monday with a special guest and what makes her crafty life easier on Tool Talk!

Friday, June 14, 2013

Graphic Black & White

Todays the last day of my wedding theme week. I'm a little sad, I really liked this theme! Today's card is a little more CAS yet still a little elegant. I went with a traditional black and white color palette.


I punched a few squares and stamped a little design on them then made a little border down the side of my card. I really debated adding a little pop of color. It was very hard, but in the end, left it to a pure black and white theme.
 
That's it for me today, I hope you have a GREAT weekend! Make sure you stop in on Monday to see my special guest blogger. She'll be showing us one of her favorite tools on Tool Talk!!

Thursday, June 13, 2013

Dressed for a party

I'm still on the fence with yesterdays card. But not today's...I love the fun flirtyness of it!

I just love the glamour dress stamp but rarely have an occasion to use it. I jumped at the chance to pull it out for a fun wedding shower card. I colored the dress using some cheap Rose-Art colored pencils and orderless mineral spirits to blend and shade it. I've had some of the pretty Crystal Lacquer Pearl Pens from DeNami tucked away but hadn't gotten around to trying them out yet. I added some of the pink to the necklace and LOVE the result. It's so easy to use and the tiny tip was perfect for the itty bitty pearls.
 
That's all for me today, I'll see you back here tomorrow with a little formal black & white wedding card.

Wednesday, June 12, 2013

Simple elegant wedding card

Weddings have such a wide range when it comes to themes. I for one got married in Vegas (no, not in a drive-thru by Elvis even though hubby was begging) so mine was a simple no frills kind of thing. But then there are the more formal, beautiful & elegant type weddings that pull out all the bells and whistles. Rich elegance everywhere you look from the bride to the decorations and cake. With that in mind I wanted to create a little card that would fit right in.
 
When I picture that type of wedding I think of a golden hue and lots of swirls and elegant rich looking designs. I think this little creation just about covers it all.


I wanted to keep the embellishments pretty simple since my patterned paper is so busy. I had originally planned on using a full scalloped circle with the thinking of you circle stamp but it just didn't look right. I simply cut it in half and tucked it under the bow. The jury is still out on how I feel about this card. The fact that I'm just not a "formal" type person is really throwing me off I think...what do you think about it???

Are you ready for another fun wedding shower card...then make sure you stop back in tomorrow!! :)

Tuesday, June 11, 2013

Fun & flirty wedding shower card

Hi everyone and welcome to day 2 of wedding week! Did you enjoy yesterday's card...I hope so!!  I wanted something fun and bright so today's card goes in a little bit of a different direction. I pulled out some Valentine's Day stamps and pretty Valentine's Day patterned paper and went from there....
 

Who says you can't use a valentine's theme, just change up the sentiment and there you have it, it works for both! Ohh and I just couldn't resit sprinkling in a few sequins to finish it all off to give it a more playful look.

Pssst!!! the heart swirl and solid heart outline are on clearance at a great price ;)

I will see you tomorrow with a more formal and elegant wedding creation. Thanks for stopping by!!

Monday, June 10, 2013

A little Craft Dash bonus post

If you're looking for my Patterned Paper Blog Hop card, you can find it right here! Thanks so much :)


Hi every one, I'm back again today with a "bonus post".  I didn't want to interrupt the Wedding Theme week but need to enter a card for the 10 Minute Craft Dash over on the Pretty Pink Posh blog so that means a two post day! ;)

Is that a yummy color palette or what?!?! Paulina said we were to use light yellow, red and light blue, however, when I was looking through my cardstock and PP I had trouble finding anything light yellow!! Everything I had was more of a darker golden yellow. Well, ya know what that meant don't ya....yup, I made a "craft dash" to Michaels, lol!! ;) Anything for an excuse, right?? I'm glad I went. They are re-arranging the whole store so had 40% - 75% off a ton of goodies. I wound up with at least a hundred dollars worth of product and only spent thirty bucks! Woo-Hoo for me! Ya'll have no idea what it costs to run this blog, lol, I'm super excited to have some new goodies to bring to the table and at a bargain price to boot! Well enough of all that foolishness, let's get on with the card I created shall we?
 
Here's what I pulled out for "just in case" reasons. I had a good idea of where I wanted to go with my card because I had seen a layout on Pinterest and fell in love with it and wanted to give it a try. I changed it up a little, but then don't we always end up putting our own little spin on our projects?


Here's my desk after the chaos...

Just look at those open inks....UGGGG, pet peeve of mine. Only for the 10 Min CD will I ever have them just laying open all willy-nilly like that! ;)

Here's my finished card that I completed in just 9 min 22 seconds...
I created this little cutie using just 3 stamps and saved a TON of time by making the little knot instead of one of my usual fluffy bows! I'm really feeling the knot though, looks adorable doesn't it? Unfortunately no matter what I did to the picture you just can't hardly see the blue "stitches" on the blue PP. You can in person though, what a bummer that I just couldn't get it to cooperate! Yup, I just love this color palette and I'm definitely going to revisit this layout in the future!!
 
That's it for me today...promise ;) I'll be back here tomorrow morning bright & early with another wedding theme card for your enjoyment (well, I'm hoping you're enjoying them!). Have a great day!!!!


Rosevine wedding card

Hello everyone, hope you were able to join in all the fun for the hop yesterday! There's still time to hop along and leave comments for a chance to win a yummy DeNami gift certificate! If you're looking for my hop post, it's just one down, thanks!!
 
Well, I hope you enjoyed last week's Father's Day theme! I had a blast showing you my take on a few creations. Now I'm all geared up for Weddings! Unfortunately I only know one person getting married this year, but that didn't stop me from making TONS of cards. Once I got started, I just couldn't stop. lol! I wish I had a few of the DeNami wedding themed stamps, but they just aren't in my budget right now :(  but hopefully next wedding season I will have a few more wedding stamps (the wedding bells & contempo couple...sigh). Even with limited stamps, I have a ton to show so life is good, right? Let's get started with what I think may be my favorite one....
 
 
This card was super easy to create and as a bonus, I used up some scrap rose colored cardstock and a little stashed vellum! I knew I wanted the rosevine heart to be my focal point and that I wanted to have a pretty little doily in there somewhere and after a few mishaps came up with this. I've never stamped on a doily before, but why not, right? I finished it all off with a few black rhinestones, some fussy cut roses from the rosevine petit four set and a yummy silk bow I made from a thanks for ordering freebie from Ellen Huston.
 
That's it for me today. I'll see ya back here tomorrow with a fun wedding shower card! Don't forget to stop by the DeNami blog for the full list of hop participants so that you can play along if you haven't already!!


Sunday, June 9, 2013

Patterned Paper Blog Hop - June 2013

Are you ready for a fun blog hop full of wonderful inspiration?? I must admit that this months hop kinda snuck up on me and I was scrambling to figure out what projects I wanted to make this past week!
When: The blog hop starts on June 9th at 6 AM, PST. However, you have until June 10th, 2013, 11:59 pm PST, to leave comments on all the blogs (to be eligible for a prize).Why: To be inspired by fun DeNami Design creations and also the chance to win mini shopping sprees on the DeNami Design website!

Prizes: We are giving away THREE $20 gift certificates to our website! We'll be giving away one gift certificate to a random participant (DT members not eligible) and then we'll also be giving away TWO gift certificates to TWO people who comment along the hop!
You should have arrived here from the very talented Tenia Nelson's blog. That gal always blows me away with her textures, dimension and color combos! If you didn't, don't worry, you can see the whole list of participant by going to the DeNami blog!

I have 2 separate things to show you today so let me apologize for the long post upfront ;)

First off, if you're like me, you have a drawer or basket full scraps of your beautiful patterned paper. I just can't seem to throw any of it away!! With that in mind, I wanted to show you a couple of ways I use mine. These cards (with the exception of the card base) were made from only scraps!!


Now that you've used up all of your scraps and don't have any patterned paper left, why not make some patterned paper of your own! If you follow me here on the Addict blog, you know I do this most often. I just love combining my DeNami stamps (especially the polka dots & Petit Four sets) to make a pretty little background.

*gasp* when editing the picture I noticed that I forgot to add my celery panel between the rose and cream colored stamped one!! Oops, too late now!!
I just love how I can make a background, then make a perfectly matching focal point!


That's it for me today, off you go to visit with the amazingly talented Tammy Hobbs!! I can't wait to see what beautiful creation she's made for us...I know whatever it is it's going to be stunning! Don't forget to leave those comments for a chance to win a DeNami gift certificate and I'll see you right back here tomorrow to kick off "wedding week"!!