Monday, December 30, 2013

Ringing In The New Year - blog hop

Pssst...if you're looking for my The Shabby Tea Room post, it's just one down from here :)

Hello everyone and welcome to a very special Ringing In The New Year blog post! I can't believe yet another year has come and gone! I'm so very thankful for a lot of things in my life and you are one of those things. I'm honored and humbled that you take the time in your busy life to visit my little blog week after week and as always, you are free to contact me with any questions or suggestion as to what you'd like to see here on the blog weather it be a specific stamp or new segment. I really do appreciate each and every one of you and can't thank you enough for all of your love and support! I hope with all my heart that 2014 brings you health, happiness and wonderful new adventures to enjoy.
 
Today I'm honored to have been asked to help a very sweet friend celebrate a dream come true...she started her own line of stamps! We have a small but fun filled blog hop for you today that starts at 2:pm cst. :)  Let's get started, shall we? 

I'm so very proud of my friend for all that she's accomplished. She started the ever popular Jo's scrap shack and now has branched out to start her very own stamp line, 3 Twenty Crafts! What a scary yet amazing step to take in life. I am wishing her success in her new adventure and am positive that 2014 will bring so many new and wonderful things for her!

If you're following along with the hop, you should have arrived here from Tina C's blog. If you didn't and want to start from the top of the hop, just head on back to Jo's Scrap Shack for a full list of participants :)

I paired up her beautiful Winter Wonderland set with some left over Bo-Bunny papers that I had from last weeks card I made for The Shabby Tea Room and came up with this....
Isn't it amazing how you can achieve such different looks with the same paper? This time around I chose  navy blue cardstock for my card base and I reversed the papers by using the pretty chevron pattern as a large layer and the snowflake pattern as a trim piece. I stamped the 3 Twenty Crafts sentiment from the Winter Wonderland set (don'tcha just love the pretty font??) on my focal panel and then stamped one of the little snowflakes from the set onto white cardstock, punched them out and popped them up using foam tape. I added some yummy iridescent sequins to finish it all off :)

Well, I'm last on the list and I thank you for joining us today. I hope you enjoyed this little hop and don't forget to stop in at Jo's Scrap Shack to see what all Jo has going on!!

The Shabby Tea Room - it's party time!!

Hi everyone :) and welcome back! Did you have a Merry Christmas? I hope that yours was as enjoyable as mine was.  I have a LOT to show you today so we better get started.

Not only are we starting a new challenge at The Shabby Tea Room today, but I'm participating in a blog hop for 3 Twenty Crafts! And to top it all off, I went a little crazy with today's The Shabby Tea Room challenge and have 3 different cards to show you, lol!! That's a lot going on for one little day isn't it??

This week our sponsor is The Cutting Café.

They have such wonderful cut files and are super easy to use :)

Here's this weeks inspiration picture and requirements:
Use the following: black, kraft & cream


I decided to play with The Cutting Cafe's Wine Glass file. I was able to make 3 totally different cards! For my first card, I thought I'd show you haw the file is when you download it. It's a little card that opens and has a little matching outside cover and inside panel.
It's so darling and would be perfect for any type of party or even a wedding!!

I decided to turn mine into a party invitation :)

Now that you've seen how it comes, let's see how easy and fun it is to change up....
 

This is a regular A2 sized card. I simply saved the inside panel image as a jpeg using the paint program that comes standard on everyone computer. Then I simply printed it out real small (wallet sized I think) and fussy cut them out by hand. You can't get much easier than that!!
 
This next card took a few steps up in difficulty. Well, it's not so much a card, it's an invitation. Well not so much an invitation as a tag and maybe not really a tag because it slides open...Ohh gosh, I have no clue as to how to classify it, lol!! All I know is that it turned out darling, lol!!
 

Anyway, lol, I opened the cut file into a little program on my computer and was able to change it up just a little. I stretched the little wine glass out making a champagne glass...how fun :)

 As I said earlier, the tag / card swings open to reveal the invitation. I kept the glass as an actual card so you can open it to reveal a little surprise (I snipped the stem so it can easily be tucked / untucked under the ribbon so it stays closed nicely)....


What do you think on how I used the little wineglass...which is your favorite?? I hope you can join us this week and play along!!

Monday, December 23, 2013

The Shabby Tea Room - Elegant Merry Christmas

Hello and welcome to another The Shabby Tea Room Challenge! This week we are brought to you by a fab sponsor, The Ribbon Reel! I could spend all day on their site looking & drooling over all the yummy ribbons and doo-dads!! 


How about we this weeks inspiration picture...
Isn't that pretty?? This weeks we are to use: buttons, snowflakes and the colors silver & white

I know when we think of Christmas colors that a pretty charcoal grey usually doesn't come to mind. However, no one ever said I was normal, lol!! ;)  I like to think outside of the box and use unexpected colors...I think the charcoal lends a touch of elegance to my little card and I like the overall richness of it.


That's all for me today, I hope you can play along with us at The Shabby Tea Room!! I won't be posting for rest of the week due to Christmas, but I'll see you right back here on Monday with a new Shabby Tea Room challenge and a fun blog hop to ring in the new year for 3 Twenty Crafts!!!

I hope you have a very Merry Christmas :)

Friday, December 20, 2013

Merry Christmas

Hello everyone and happy Friday!! Ohh my gosh...the LAST shopping weekend before Christmas...are ya ready??? Can you believe Christmas is Wednesday???? I'm sooo not ready. Usually I am calm and collected and have things done well in advance...not so much this year and I'm in panic mode! I just have my son to shop for and it's all his fault since he won't give me a clue as to what to get him. Darn kids!!! 

With things being all willy-nilly this time of year I decided to pull a cute little card out of the Addict vault. I know what you're gonna say..."again with the Medium Pine tree??" Yup, again with the Medium Pine Tree...told ya it was one of my faves, lol!! ;)
I just LOVE making my own patterned paper and this little card is chocked full of DeNami yumminess!! For the card base I simply used the polka dot background with some Versa Mark ink. On the larger panel I used the same polka dot background stamp then stamped the berries and pine cone from the Classic Christmas stamp set. On the smaller panes I used the polka dot background again and then stamped the word "Merry" from the Merry Christmas sentiment along with the holly leaves from the Classic Christmas set I used on the other panel. It seems like I used a lot of stamps, but really, I didn't...5 stamps is all it took - medium pine, medium swirl, polka dot background, Merry Christmas sentiment & Classic Christmas. Having that little Classic Christmas petit four set made it very easy since you get 4 matching images in one little set. I couldn't live without my DeNami petit four sets!!

Well that's it for me today. Be careful out there this weekend, too many party goers and shoppers! See you on Monday :)

Wednesday, December 18, 2013

Monocromatic winter scene

How darling was yesterday's project? I'm totally in love with that little stocking treat box and am planning on trying to make another before Christmas. I hope you can join us over at The Shabby Tea Room for some fun!

You remember the green & white card I made last week that I had said started out as monochromatic card but I ended up adding a touch of gold because I just wasn't happy with it? Well, I was still in the mood to try the whole monochromatic thing again....

This time I resisted on adding a pop of color somewhere ;)  For my focal point I wanted a grouping of trees but didn't want it to look to busy so I stamped 3 trees at varying heights then masked them and after inking the stamp again I would stamp on scratch paper first so when I stamped on my panel it would be faint...almost like shadows. Then I did the same thing with the little snowflake in that same stamp set.


I combined my much loved DeNami snowflakes stamp set (used the large flake) with some darling stamps called Winter Wonderland from a brand new company called 3 Twenty Crafts

I'm sure you've seen me entering the super popular challenges over at Jo's Scrap Shack, right? Well, she just launched her own stamp line...how awesome is that?? Right now her store is stocked with the new line of clear stamps (more designs to be added soon), little doo-dads, sequins, score tapes, stickles and distress inks. I know she has a new stamp release set for January and I think there's one for February too...I'm totally excited to see them! :)

Well, like I mentioned, Jo, the owner / designer of the new 3 Twenty Crafts runs the JO's Scrap Shack challenge blog. Right now she has a Design Team call out and I'm applying! Fingers crossed :)  This is a card I made for the application. 

Well that's it for me today, I'll see ya right back here on Friday!! :)

Monday, December 16, 2013

The Shabby Tea Room - Stocking treat box

Hi everyone and happy Monday :)

Today I have the cutest little treat holder to share with you that I made for this weeks The Shabby Tea Room challenge! Our sponsor this week is Creations By AR.
Ohh my goodness, they have every template you could ever want and more! It's so fun taking a plain template and dressing it up to fit your style and occasion!

This weeks inspiration picture is so darling...
Use:

  •        red
  •        white
  •        gingham
  •        gingerbread


Look how cute my little "stuffed Stocking" turned out :)  Now I don't want to fill it up and give it away, lol!! I received my file in a PDF (template & instructions) and simply saved it to the "my pictures" on my computer then printed it out on my normal printer on normal printer paper. After it printed I laid the template over my patterned paper & plain cardstock (you can hold it in place with Washi tape) and cut it out with scissors...no adjusting sizes or having to jump through hoops, just easy peasy print and cut!! 

Here's a few more views....


You can fit a fair amount of candy, cookies, a pair or 2 of cute little slipper socks or even hair goodies in this little stocking. The cavity is 5" deep and 2 3/4" X 2" wide. 
Do you like my little tag? I started out with a normal tag shape then layered on some goodies. I used DeNami Designs Everyday Greeting stamp set for the sentiment and fussy cut some candies from the Candies stamp set. The darling gingerbread people are from the November release, "HO HO HO" stamp set at Paper Sweeties. They even have a matching die cut set so I could easily cut them out :). But wait, that's not all that's going on with this adorable stocking...this cutie has a little hidden surprise!!! 

There's a secret compartment in the toe! It could easily fit couple of Hershey kisses or nuggets. How cute is that???

Well, that's all for me today. I hope you like my little "stuffed stocking" by Creations By AR as much as I do :)            See y'all on Wednesday!!!!

Friday, December 13, 2013

Monochromatic Christmas card

Whew...you wouldn't believe what just a couple of days off your blood pressure meds will do to a person! Saw my doctor, got a refill and am feeling much better!! :) So much better that I have a brand new card for you today!!

Before we get to that, I have to give a big ole shout out for our own uber sweet and seriously talented DeNami gal, Lisa Elton! She's one of the newest DT gals (starting January) over at Paper Sweeties!! How fun :) and I can't wait to see what she makes with those darling images!!! Congrats Lisa!!!

Alrighty then, lets get to todays little card! I saw a darling little monochromatic card in green and white on Pinterest (I'm sure you aren't surprised, lol) and wanted to make one myself....
Well I almost nailed it, lol!!!! After I made the card I thought it really needed a little pop of color so I redid my medium pine tree with it's little medium tree swirl overlay stamp. Well, doing that led to another change - I had to pull the gold color from somewhere so I changed out the green rhinestones for gold ones. All in all, I'm happy with my card even if it isn't the monochromatic card I started out to make :)

That's it for me today, I'll see you back here on Monday with the cutest little Christmas treat box!!! See ya then, have a great weekend!

Wednesday, December 11, 2013

Christmas Chickies

Hi everyone :) Today I decided to pull a fave card of mine out of the archives. I wanted to show some Christmas chickie cuteness and since I wasn't feeling so well yesterday I thought it was the perfect time to dig this cutie out...
You can't get much easier than this little card. I dry embossed a red card base then layered a green, red and white panel across the upper portion. I stamped the little circle scallop then stamped the little reindeer chickie inside it. for the middle I used the darling little elf chickie and polka dot background stamp to make a little tag that I attached with foam tape. Easy peasy and great for mass production if you make a ton of Christmas cards to send out.

Monday, December 9, 2013

The Shabby Tea Room - Christmas Blessings

Hi everyone and welcome to the start of another fun challenge over at The Shabby Tea Room! If you're looking for my DeNami Design Razzle Dazzle blog hop card, it's just one little post down! Don't forget to leave comment throughout the hop to be eligible for the random drawing gift certificate prize giveaway! Now remember, if you get lost along the way, just go to the DeNami blog for the full list of participants :)

Now then, let's get along with today's post shall we? This week we are using two of my fave elements on our project...
Use: make a holiday card using Buttons & Polka Dots

Now if you've known me for any length of time you'll know how much I puffy heart love me some polka dots and how I also love to use buttons :)  Ready to see what I created??
I started out with a chocolate card base that I layered a mix of  patterned papers from a 6X6 stack along with papers and images from our sponsor for this weeks challenge. Both doileys and the music sheet flag are patterned papers from By Digital Paper. I used Christmas Baubles (ornament & greenery) & Antique paper #1 background collage. the polka dots on on the top doily is my polka dot background stamp from DeNami Design and the sentiment along with the rusty jingle bells and mint seam binding are from Paper Sweeties

By Digital Paper - an Etsy shop


That's it for me today. I hope you can play along for a chance to win some beautiful images from Janet's Etsy shop! :)

Sunday, December 8, 2013

Denami Razzle dazzle blog hop - 12/8/13

It's a happy happy day because today it's time for another FUN DeNami blog hop :)

Let's get started shall we.... Here's the deets:
When: The blog hop starts on December 8,2013 at 6 AM, PST. However, you have until December 9, 2013, 11:59 pm PST, to leave comments on all the blogs (to be eligible for a prize).

Why: To be inspired by fun DeNami Design creations and also the chance to win mini shopping sprees on the DeNami Design website!

Prizes: We are giving away THREE $20 gift certificates to our website! We'll be giving away one gift certificate to a random participant (DT members not eligible) and then we'll also be giving away TWO gift certificates to TWO people who comment along the hop!

You should have arrived here from Tenia Nelson's blog. I'm betting you LOVED what she had for ya, her work is amazing :) If you didn't that's not a problem, simply head back to the DeNami blog and you will easily be able to get back on track.

I have 2 little projects for you today :) This first one was pretty darn easy but if I did it again I'd make one little change...
The change I'd make is that instead of rhinestones I'd use red stickles. This card has plenty of razzle dazzle! There's over 60 rhinestones...how's that for razzle dazzle, lol??? As I said, this card was super easy, I simply die cut the green holly panel and laid it over a piece of pattern paper then attached it to a kraft card base. Then I added a little sentiment (stamped from the Holiday Greetings set & popped up on foam tape) and added little bows.

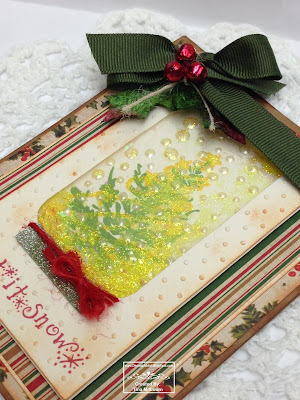
Now this next card was a little harder and took forever to make, but boy oh boy am I happy with the results! if you know me at all you know I'm a Pinterest addict. Have y'all seen that gals are making snow globes with upside down mason jars??? ADORABLE!!! Well it gave me the idea for this little card...
Yup, it actually works!!! I made a fun little shaker card with my mason jar die cut :) And what would the season be if I didn't pull out one of my all time fave DeNami stamps, Medium Pine? Did you know that there are 3 stamps that you can stamp on top of this darling tree...I used the Star Swirl on this card.
After stamping the tree and swirl I used a cream pearl pen to make the "snow" inside the jar and added some DeNami Citrine glitter to the swirl and a little shaved ice from Stampendous to the "ground" around the tree. I added a little of both the glitter and shaved ice inside the "jar" to free float when you shake the card. The sentiment is another one from the Holiday Greetings set that I used on the other card. 

Allrighty, now off you go to visit with the super talented Tammy Hobbs!!! I'll see you back here tomorrow with some new The Shabby Tea Room challenge inspiration :) ...shhh, this one is right up my alley, it calls for one of my FAVE things...polka dots!! Don't tell anyone I told ya because the challenge doesn't start until tomorrow!! ;)


Friday, December 6, 2013

Happy Holidays

Hello everyone :) Did you make it through the work week? I barely did!! Went to a doctors appointment and someone in the waiting room had on some perfume/product that triggered my asthma. It was so bad that the nurse whisked me out of the waiting room and was ready to call an ambulance because they said I was going into anaphylaxis. My face turned red, started swelling, I couldn't see but it didn't matter since my eyes were swelling shut, stabbing pain in my forehead, and my throat started getting itchy and swelled too. Thankfully just leaving the waiting room did the trick and I instantly started to feel better so I was spared getting stabbed by a giant needle a little shot in the thigh (ouch!)!! The nurse looked a little disappointed, I think she really wanted to stab someone...eekk! Things like smells trigger my asthma all the time, but in all my life I've never had anything like this happen!! It was crazy!!! Within an hour I was 100% myself again...thanks goodness! I guess if you're going to do something like that it's a good thing to be in the doctors office, lol!! 

Well enough of my wonderful week, let's get to some eye candy!!! Did you catch my picture tutorial on Wednesday? Very easy and quick to put together and seriously, in this day and age we are more likely to give a gift card so we need an endless supply of holders. The best part is you can change the patterned paper to whatever theme you want weather a birthday, anniversary or some other holiday.

 Did you remember that Sunday is a brand new DeNami blog hop?? I thought I'd start it a little early and show you this little cutie...

I just love this Holly Block stamp (bonus...it's on clearance!) because I have my focal image and sentiment all in one! Makes it easy peasy for sure ;)  All I did was stamp it out in a green ink, colored in the holly leaves then added red stickles to the berries (even made a few extra) and trimmed the box & leaves in green stickles. A bit of twine and a Washi border and your're done! Super fast and easy if you need to create a lot of Christmas cards.

Well that's it for me. I will see you right here on Sunday with my projects, yes, I did 2 as usual, lol!! Hope you can join us for the hop!! To get started on Sunday just go to the DeNami blog :)

Wednesday, December 4, 2013

Project Corner - Present Giftcard Holder Tutorial


Hi everyone, it's been quite a while since I've done a photo tutorial hasn't it?  I still haven't replaced my camera yet. I'm having a hard time coming to terms with the loss of my beloved "friend" and am kicking and screaming about having to find a replacement. Who has enough time on their hands to not only research cameras but to learn how to use it too...not me!!! So for now, my phone is not doing too bad a job ;)

Like I mentioned last week, I saw something similar to this on Pinterest...hmmm, maybe if I didn't spend so much time on Pinterest I could actually have time to research cameras??? Nah!!!! ;)

This little guy uses barely any paper (scraps really) and is super easy to put together - don't let the number of steps fool you, I just really broke it down!! I didn't have any measurements for the one I saw so I faked my way through it and I think I did rather well ;)

Here's what you need:

  • cardstocks -
Bottom (red) 7 1/2" X 4 1/4"
top (santa print) 3" X 4 1/4"
strip (green) 1/2" X 3 3/4"
inside panel (white) 3 1/2" X 3 1/4"
circles (green & white) 1" & 1 1/2"
  • hole punch
  • brad
  • glue
  • ribbon
  • ink
  • sentiments
 

 Using the 7 1/2" X 4 1/4" piece...fold in half, then apply glue along 2 sides as shown in picture. Close fold and let dry just a minute.

Using a 1" punch (or just a pair of scissors) make a little notch in the "open" end (not glued or folded) of the square.

Using the 3" X 4 1/4" piece of patterned paper, fold it in half and set aside
 

Using the little 1/2" X 3 3/4" strip, attach it to the large notched square and trim to fit
 

Take the folded piece of patterned paper and place it over the notched end of the red square so that the square is actually inside the patterned paper (you should be able to see the patterned paper on the front and back). Next, using your hole punch, make a hole near the bottom left corner of the patterned paper then attach the brad. This forms your "lid" to open the holder


Setting that aside, bring out your punched circles. Stamp your sentiment or decorate it however you'd like
 
 Layer your punched circles and attach to the bottom right corner of the holder. Using a length of ribbon, make a bow and attach to the top of the holder

Set the holder aside and using the piece of 3 1/2" X 3 1/4" white cardstock, stamp a sentiment  (or decoration) at the top

Using a glue dot or adhesive gun, attach your gift card to the 3 1/2" X 3 1/4" white panel as shown


Open your holder and slip the gift card inside :)  See, I told you it was EASY-PEASY!!!
 
 
 The one I made to show you haw to do it was pretty plain, but you can dress it up quite a bit by scalloping the edge of the "lid", dry embossing the bottom portion, using all patterned papers or stamping patterns, using ribbon over the narrow strip of cardstock on the bottom, use a die cut or image in place of the punched circles, punch 2 small holes at the top to feed the ribbon through before making your bow vs. gluing it....just to name a few ways. Have fun with it, change it up and make it your own :)


Monday, December 2, 2013

The Shabby Tea Room - Tags!

Hi everyone and welcome back from what I hope was a long and restful weekend! Have you recovered yet? I took Friday off from the blog and work so I ended up with a MUCH needed 4 day weekend...blissful! These 50hr work weeks cramp my crafty style and tend to get in the way quite a bit ;) so I was able to have a little fun and get caught up on a few things and even managed a little Bo-Bunny workshop at the The Stamp Pad store. I made 10 cards AND was served a nice lunch..what a great way to spend a Saturday!! Well, enough of my rambling, you're here for some yummy eye candy and we should get to it, right?
 
This week I'm way excited because an awesome little stamp company is sponsoring The Shabby Tea Room!!!
  
 Paper Sweeties™ LLC is owned and illustrated by Debbie Marcinkiewicz, and offers high quality, on trend acrylic stamps and metal dies. Our heartwarming images allow paper crafters to create adorable dolls with interchangeable outfits and accessories! We also have a wide variety of wonderful all-occasion sentiments, labels, frames and accessory sets - perfect for every paper crafted project! The Paper Sweeties boutique carries tea-stained seam binding too! The Sweeties dolls, accessories and sentiments are so much fun to play with and are sure to bring back fond childhood memories! You’ll enjoy using the Sweeties stamps and dies to create projects for card making, scrap booking, party invitations and favors, home decor, gifts and so much more! www.papersweeties.com Winner will receive a $20 gift certificate from the Paper Sweeties boutique!

And not only is one of my favorite challenges being sponsored by a fave stamp company this week, but yours truly got to pick the theme...now that's a WIN WIN WIN!!!! Makes me extra excited :)
 
I know that this time of year a lot of paper crafters like to make tags, so I thought a little "tag" theme would be fun. There are so many fun ways to use tags...well, I started listing them and then erased what I wrote because I realized that I was starting to sound like Bubba listing all the ways you could use shrimp (note to self: re-watch Forest Gump for the millionth time) ! I'll spare you all of that, lol!
 
Use The Following:
  • tag of any type - gift, on a card, on a present, altered, etc....
I have 2 projects to share with you today. I made an altered tag and a card with a tag....


I have to give myself a little pat on the back for this altered tag. I'm really lacking in this department. I always have such trouble making tags but somehow this tag came out just like I pictured it! I wish all the shimmer on it could be picked up, by the camera, but ya can't win them all, right? After I distressed the edges of a 6" kraft tag I stamped white snowflakes on the top and a punched edge strip (kraft too) then using Shimmer Mist added LOTS of sparkle!! Patterned papers, punched snowflakes, bling, ribbon and Abigail  (cut with her Sweets Cuts die) wearing the dress from Warm Winter Wishes were layered on the I got the idea to ad a little "tag" to my tag so I added one using my tag die cut from Taylored Expressions (puffy heart love that die!). I used a Wink Of Stella pen (glitter pen/brush) to add touches of sparkle to Abigail's dress and the snowflakes.


This little card uses the same snowflake punches and a pretty little die cut doily to accent the darling little Angel (popped up with foam tape) from the brand new Make The Season Bright stamp set (cut with matching die). I used the Wink Of Stella on her wings and cheeks for a little sparkle. The sentiment on my tag came from that same stamp set...I just love how it has that pretty little border thingie and mix of fonts all in one piece!! I finished it all up with some fun rusty jingle bells and tea stand seem binding all from Paper Sweeties too.
 
That's it from me today...I feel like I rambled on FOREVER!!! I hope you can join us this week with a little tag of your own. Remember, any type tag is acceptable...plain, simple, ornate, gift....the list goes on and on!!!
 
Don't forget, I'll be back here Wednesday with a picture tutorial for one of the fun (and super easy) gift card holders I showed last week!!