Thursday, October 31, 2013

Happy Halloween!!!!

Just wanted to stop in and wish you a HAPPY HALLOWEEN!!!


Yesterday Downtown Dogs daycare had a suprise photo shoot for their furbabies :)  (my furbaby attends daycare once a week to get rid of some energy so mommy doesn't have to start drinking, lol!)

Wednesday, October 30, 2013

Happy Halloween!!

I'm a bit sad today :(  because this is the last Halloween card I have to share with you. I didn't have near enough time as usual. I hate that the Halloween season is over so quickly!! Well, here it is, my last card of the season.....


You simply couldn't ask for an easier card to make! I layered a white panel (using foam tape) on a white card base, added random strips of Washi tape and then added the darling DeNami Design  Halloween Spider Web (using foam tape) that I had punched out. I finished it all off with a matching twine bow and some glitter. This card is the perfect example as to why I puffy heart LOVE my Quickie Glue Pen...all those thin lines were a breeze! :) This card litterly took five minutes to throw together! It's CAS + AC = clean and simple and cute! ;)
 
I'll see ya back here on Friday with a fun Autumn card!! Have a great day :)

Monday, October 28, 2013

TSTR - Special Friend Blend

Hi everyone and welcome to another challenge brought to you from The Shabby Tea Room! Before we get to today's post, I must tell y'all that I am having an amazing time at The Shabby Tea Room. I'm learning a lot of new things since I'm using cut files and digi stamps...what an experiance. :) The great thing about the cut files from our various sponsors is that they not only come in SVG, but also come in a PDF for gals like me that don't own a compatiable cutting system! With that being said, check out my little card I made for this weeks challenge....
Challenge rules: Use Pumpkins and Glitter

I used a TON of stamps on this cutie,. First time I've ever made anything like this, but I'm seriously loving the fun shaped cards! I've done a little "subway art" before, but just on a small focal panel, not the whole thing...I'm pretty darn happy with the results :)

From Paper Sweeties:
You Are Fablous
Thanks Berry Much
Sweeties Wagon
Tea For Two

From DeNami Design:
teeny star
small dot border
garden accents stamp set

This week our challenge is brought to you by The Cutting Cafe.


The Cutting Cafe
The Cutting Cafe is your one stop for affordable cutting files and printable stamps. We offer a huge selections on just about any occasion.

Friday, October 25, 2013

Elegant Autumn Greetings...

The air has taken on a crisp chill and wonderful scent, the leaves are falling and you can hear the passers-by shuffling through them....sigh, I just love this time of year :) Makes he want to snuggle up with a cup of hot tea, my hubby and fur-babies.
With fall on my mind, I couldn't help but break out one of the newest fall stamps from DeNami Design, Elegant Autumn Scene...it's so perfect!
What I just love about this stamp is that it's a little bit larger so it makes a perfect focal point AND it comes with the pretty little sentiment! However, with no trouble at all, the sentiment can be left off making this little stamp very versatile! If you look closely at my card, you'll see that I very easily inked up my leaves in a tan color and my sentiment in a rust/maroon color. I didn't use any masking at all, just simply held the stamp in my hand (rubber side up) and using the ink pad in my other hand, simply inked it up...easy peasy!


I simply layered some soft fall colored patterned papers with kraft and popped my image up on foam tape. Since I wasn't adding any elements or doo-daddy things I decided to add the little acorn from the Autumn stamp set to fill in the image just a little. I'm thinking it still needs just a tiny bit of jazz so I'm going to go back and scatter a few pieces of brown bling through the scene...whatcha think?

Today I thought I'd enter another card on the Ribbon Carousel blog  for their fall challenge :)

Wednesday, October 23, 2013

Simple yet elegant "any occasion" card

Hi everyone and happy Wednesday! Lately I've felt myself struggling and don't seem to have any vision when I try to craft. Have you've ever felt that way? I sit at my desk surrounded by darling doo-dads, pretty papers and ribbons galore yet I can't seem to make anything I'm happy with. I think I have a form of writers block...card block perhaps? After 2 weeks of me sitting at my desk and shoving items from one side to another just to be left untouched and unappreciated, I decided to stop the madness and get back to the basics.

If you've followed me for very long, you know that most of the time I tend to not use patterned papers because I really do enjoy making my own. I recently made a Halloween card that reminded me of what I've not been doing and I've realized how much I miss it. That's not to say that I don't own any patterned papers, lol. I'm actually mortified when I look at my horded stacks (yes, there is an "s" on stacks!) of gorgeous papers. I have an severe addiction to those wonderful little 6X6 paper pads...sigh.

Well, as I stated, I wanted to get back to the basics to clear my mind and get myself out of my little slump. I started by pulling out some of my favorite DeNami Design stamps and doing what I do best...made me some yummy patterned paper! My patterned paper was way easy to create and it only used 2 stamps...large dot swirl & the little fern from the elegant floral petit four set.


I added a simple little (raised on foam tape) layered panel using one of the pretty images from  ornamental centerpiece set and a fun ribbon treatment on the thinking of you sentiment (raised on foam tape) to finish it all off. This card came together fairly fast and looks great for any occasion.

I'm starting to feel more like my old self already! :)  Have a great day and I'll see ya on Friday!


Monday, October 21, 2013

TSTR - Fall Florals

Hello my crafty friends! Today we have a new challenge starting over at The Shabby Tea Room. Isn't this inspiration picture pretty? I just love the white pumpkins, bright fall foliage and trendy burlap bow. :) 


Challenge Rules: Create a card or project using fall flowers

Here's my take on the inspiration picture....

I couldn't resist making this fun little "working" lantern for my project this week! I wanted it to have a metal look so I started out with some plain brownish/goldish 8 1/5 X 11 cardstock and printed my template on it using my home printer. After I put it together I used a couple of different inks and a metallic paint to distress it. Ohh, I left something out. Even though it didn't call for it, after I cut out my little windows, I added a piece of acetate over them for a more "realistic" window look. I found a cute and absolutely perfect little autumn vine with the leaves, pumpkin and pod thingies at Michaels. I just added the rust colored flower along with the mustard material flower. I thought the little white pumpkin got a little lost so I popped it off and was able to add a bit of burlap to the vine and snap the pumpkin back on. I used a piece of wire for my handle then wrapped it in a few strands I peeled from the burlap and a few more strands under my flowers finished it all off. I'm very happy with the outcome. Pictures just don't seem to do it justice.
I decided to take it one step further and bought one of those little battery operated tea lights from a dollar store.....
Now how cool is that?? It's so neat that I can light it up and I'm actually quite smitten with it. I'm sorry my pictures aren't the best, it was hard to take the pictures because the acetate kept giving off a huge reflection with and without the little light on. Maybe it wasn't such a good idea to add that before I took the pictures??? Live and learn, lol!


This week we are being sponsored by a fab little company called Creations by AR. They offer a HUGE selection of templates to make fun projects with. Some are easy like a little handled basket and some are very intricate. All are extremely creative! My little Enchanted Lantern was fairly easy believe it or not. All the cutting lines, folding lines and little notches are right there on your template and it came with full instructions! I had it together in no time at all. They also have LOADS of inspiration on their site so you can see just what you can do with their templates.

logo 200x200x300 photo GetCr13-200x200x300.png
Creations by AR is all about paper crafting specializing in 3D templates, cutting files and digital images
 
 
On Friday I checked out the new challenge over at Jo's Scrap Shack and this week's them is "Anything Goes"! Woo-Hoo, I like that...nice and easy! I'm entering my little lantern in the challenge :)
 

Friday, October 18, 2013

Trick or Treat

Did you have a chance to follow along the DeNami blog hop this past weekend? WOW, that was some serious eye candy, wasn't it?

I just LOVE me some fun Halloween cards and have another to share with you :)

I still had plenty of paper left over from one that I made for the hop so I decided to whip up this little cutie using the Halloween Stamp set, Trick or Treat cling, Halloween Fence & Halloween Kitty. The 6X6 paper pad and the little star embellishment all came from Target...can you believe it? They are starting to carry some super cute crafty goodies! The embellishment is perfect for tucking a couple of little flags under to complete my card :)


Well that's it for me today...see ya on Monday!!!

Wednesday, October 16, 2013

BOO!!!!!!

Hiya everyone! :)   Did you hop along with us this past Sunday and see all the wonderful Halloween creations? Well, just in case that wasn't enough for you, I have another little Halloween cutie for ya!


I started out by making my own patterned paper. Using a purple Momento ink, I stamped the harlequin border covering my piece of white cardstock. Then using the same ink and a wadded up square of felt I colored/distressed the whole thing. I switched to Versamark ink and heat embossed the winter tree and spider web from the Halloween set . I added a couple of strips of left over patterned paper I had from the blog hop cards and a bright length of ribbon to perk up the whole card. I was originally going to stamp my sentiment between the tree and ribbon but at the last minute decided to make a little tag instead. I love the result :)
 
I'm entering this little creation over at Jo's Scrap Shack.
 
This week she's asking for our favorite technique. Well, that's at the top of my fun meter! ;) We all know that would be stamping! I just love stamping and finding new ways to use images. If you know me, you know I definitely don't toot my own horn, but I do have to say that I'm pretty darn good at stamping in general and have a knack for making my own patterned papers.

I'm also entering in the challenge over at The Ribbon Carousel
Their theme is Fall/Halloween :) Well, since I already submitted a card that was a Fall theme, I thought I'd submit a fun Hallooween card too! 
 

Monday, October 14, 2013

TSTR - Autumn Winds

Hi everyone, if you're here looking for my DeNami blog hop post, it's just one down...Thanks!! :)
 
Today I have a little card I made using a pretty little digital image from our sponsor this week here at The Shabby Tea Room.
 
I must admit, before this DT position, I'd NEVER used digi stamps or images...but a gal could get used to this! Honestly, the digi images are making me a little lazy, not only are the images already perfectly colored for me, they're so inexpensive and you can use them a limitless amount of times because it's a file right on your computer! She also has some of the most gorgeous back ground papers...sigh, yup, I'm getting spoiled!!
 
My name is Janet, I'm Polish, live in the south of Italy and the mother of two children!!  I am a printing technician by profession, but an artist by passion.
I really like to draw and photograph everything with my camera. I am in love with old graphics and illustrations, and I always have my colored markers and pencils around me to sketch with.  I'm so happy to be sponsoring this week's Tea Room challenge!
Janet
Digital Papers by Janet on Etsy:
 

Here's the inspiration picture for this weeks challenge...
 
Challenge requirements: use a fall theme, pumpkins and a stamped sentiment
 
With all of the beautiful fall images our sponsor carries I had no problem at all coming up with this cutie...
 
Isn't she darling? The image's name is Autumn Winds. Can you believe she started out as a bookmark? I re-sized it and turned it into a card panel...easy peasy! The only thing I colored on her were the tan leaves, turning them orange so that I could pull in the orange from my darling little DeNami Pumpkin Patch Border and my Paper Sweeties ribbon. My little tag is a mix of Paper Sweeties (borders) and DeNami (Autumn & Thoughtful Greetings stamp sets)  too, lol!
 
That's it for me today...hope to see you over at The Shabby Tea Room!!


Sunday, October 13, 2013

DeNami Spooky Halloween Blog Hop - Oct. 2013

Hello and welcome to another fun filled blog hop brought to you by Denami Design!! Since it's October we're going to celebrate all that is spooky, cute and yummy about Halloween!!

Here are the deets:
When: The blog hop starts on October 13 at 6 AM, PST. However, you have until October 14, 2013, 11:59 pm PST, to leave comments on all the blogs (to be eligible for a prize).Why: To be inspired by fun DeNami Design creations and also the chance to win mini shopping sprees on the DeNami Design website!

Prizes: We are giving away THREE $20 gift certificates to our website! We'll be giving away one gift certificate to a random participant (DT members not eligible) and then we'll also be giving away TWO gift certificates to TWO people who comment along the hop!
 
Now you should have arrived here via the most talented gal I've ever known, Dana Seymour. What was Paulina thinking making me follow HER! Jeeze, after her blog I'm sure you don't want to see what paltry stuff I have to offer...sigh, talk about pressure! If you didn't (besides being lucky for me) you can find the full list of participants on the DeNami blog and get right back on track! :)
 
 
As usual, I just couldn't stop at one...

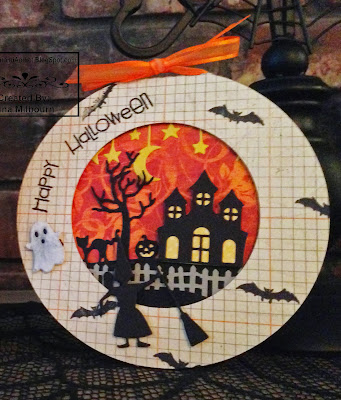
If you stopped by on Friday you saw another version of this little cutie. The class instructor was sweet enough to give me another die cut that includes the tree, house, pumpkin, tombstones and kitty (I cut the kitty off so I could move him). I didn't have another circle card or any more of the papers we used so I faked it :)   I pulled out my Creative Memories shape cutting system and made my circle card base by just not cutting it all the way around so there would be a "hinge". Then used a smaller circle and cut out the middle of the front of the card. After making my little scene I decorated the frame with the fun spiderweb from the Halloween Petit Four set and the Happy Halloween sentiment (using a masking technique).


I saw a card on the Internet that I just fell in love with and HAD to make my own version...have you ever done that? I pulled out some fun papers from a Halloween themed 6X6 patterned paper book and went from there...I made a label using the Elegant oval Frame with the Happy Halloween sentiment and the mini solid filigree. I thought it needed something more so I added some dots at the four points. I added a little sheer ribbon skirt using my ATG and just pleating the ribbon. This is popped up on foam tape over a piece of yummy orange chevron ribbon I purchased at Little Free Radical (link on Paulina's blog). To finish it all off I added a small twine bow and attached it with a tiny orange clothes pin that I added more yummy polka dots too.


Well, that's it for me today...again, I'm sorry I had to follow Dana, but seriously...can anyone and still look good??? :/
 
You will have no problem being entertained with some beautiful eye candy on your next stop, Stacy's blog! She always has the coolest projects and the most wonderful photography skills!!! She's sure to knock your socks off! See ya tomorrow with my Design Team project for this weeks challenge over at The Shabby Tea Room :)  

Friday, October 11, 2013

A spooky little duo

happy Friday everyone and welcome! Today I have a "spooky" little duo to share with you. When I made those cute little treat boxes/bags I shared with you on Monday, I also made 2 fun cards....

Sorry about the blurriness...still haven't replaced my camera just yet.


How about a close up....


Isn't this darling? The little web frame thingie is a die cut...yes, I just had to have it so I picked one up at the end of the class ;)  On this card we used orange, but can't you picture it on patterned paper of even a piece of black for a black on black texture? So many possibilities!

Here's the other little card...
The class instructor already had the circles cut out for us. The tree, cat, pumpkin, house and some tombstones that you don't see were all one die cut. The spooky house that you see here is a separate die cut that we used to cover up the original one because this one is bigger and a little cuter.
 
Don't forget that this Sunday will be the DeNami Halloween blog hop....See you right back here bright and early with a scary surprise or two!!!!

Wednesday, October 9, 2013

Elegant baby Card

Hi everyone! What a great day...the week is half over and I can see the weekend in sight!! I don't have any huge plans, but I'm ready for some down time after last weekend...I'm still worn out ;)
Today I have 3 challenges that I'm wanting to enter....


For DeNami we were to match 3 in a row and use those elements on our card / project. I've managed to match 3 different ways, lol!! If only I was that good in a real game!!
1) stripes, glitter, ribbon
2) buttons, scallops, ribbon
3) buttons, green (flower leaves), stripes

Paper Sweeties - Baby Celebration
 For Paper Sweeties, they held a fun little baby shower blog hop on WCMD to celebrate the news that Jinny Newlin is expecting and we are asked to make a congratulations or baby themed card

Lawnscaping - Patterned Papers

For Lawnscaping, we are asked to use some of our gorgeous (and usually much horded) ;) patterned papers


Well, here's what I came up with....

We don't know if the baby is a boy or girl and I didn't really want to do the old standby of green and yellows. I decided a little elegant black and cream was the way to go. I used 3 separate patterned papers that I layered (and stamped a sentiment on) before adding my darling little DeNami giraffe and bouquet (made with 2 shades of  Paper Sweeties seam binding, Prima roses and some cute little twine and a black gemstone). I added just a touch of glitter to the giraffe and after a bit of thinking, decided the roses needed a bit of sparkle too. Since I had already attached them to my card I had to use a toothpick to add some Stickles to the petal edges...I wouldn't recommend it, lol, what a PAIN!!

That's it for me today...see ya on Friday :)

Tuesday, October 8, 2013

Pretty birthday greetings...

Hi y'all! I'm poping is today with a quick little post. I wanted to enter a challenge over at Jo's Scrap Shack.

I just love Jo's blog and try to enter challenges there when I can. I've been kinda slacking on entering challenges lately but I'm getting into my groove again and feeling comfortable with all that I have going on so it's time to get back into the challanges :)

This week Jo is asking for our take on a little sketch...

Here's what I made...


Guessing I'm not ready to let go of summer quite yet...hmmm. For my card I didn't leave the border spaces (black lines in the sketch) because I wanted it to seem more like one piece of cardstock. I just HAD to break out my mucho loved DeNami Gingham Background stamp and paired it up with the DeNami Daisy Trio and the happy birthday from their All Occasion Greetings set.
 
I have to run...have a great Tuesday everyone and I'll see ya back here tomorrow!!!

Monday, October 7, 2013

TSTR - You Make Me Smile

Hi everyone and welcome to another fun challenge brought to you by The Shabby Tea Room! This week we are changing up things a little and and offering up a little sketch for you to base your challenge entry on! Design Team member Lesley has picked a great sketch that has lots of possiabilities.....


I happen to love a good sketch. This can be changed up in several ways...turn it up on end - move the "srtips" up, down or even diagional - move your focal point (oval) to the top, bottom or even in he middle. You can make it fancy or strip it down and go simple like I did here....


I used the So Sweet of You (sentiment) & I'm Having A Tea Party (vace of flowers) sets from Paper Sweeties
 
What did I change on the sketch....
 
 I turned the sketch up on it's end
 I turned the small square panel into a large square panel
Turned the oval focal point into a different shape and added a layer
scalloped the larger strip
used ribbon for the narrow strip
 
You can never go wrong with a fun sketch...hope you give it a try! :)  This week our challenge is being brought to you by an AWESOME stamp company that I was introduced to through our own resident DeNami Princess, Paulina...Paper Sweeties. I'm sure y'all have heard me talk about Paper Sweeties before and know how I puffy heart those darling images!


I'm so happy that they came out with die cuts for the paper dolls...called Sweet Cuts! They cary a full line of adorable outfits to "dress" them in along with a great selection of misc images and sentiments, but that's not all...I puffy heart their hand dyed seam binding...yummy!!
 
Paper Sweeties™ LLC is owned and illustrated by Debbie Marcinkiewicz, and offers high-quality, on-trend acrylic stamps. Our heartwarming images allow paper crafters to create adorable dolls with interchangeable outfits and accessories! We also have a wide variety of wonderful all-occasion sentiments, labels, frames and accessory sets - perfect for every paper crafted project! The Paper Sweeties shop carries hand tea-stained seam binding too! The Sweeties dolls, accessories and sentiments are so much fun to play with and are sure to bring back fond childhood memories! You’ll enjoy using the Sweeties to create projects for card making, scrap booking, party invitations and favors, home decor, gifts and so much more!

Winner will receive a $20 gift certificate from the Paper Sweeties boutique so I hope you enter our little challenge this week at The Shabby Tea Room (and remember, your design need not to be shabby at all!!)!

Friday, October 4, 2013

spooky treats for me and you...

Last week I spent a fun evening at my local stamp shop...well, it's not exactly local, but it's only 20 minutes away, that's close enough for "local", right? We made 2 fun cards and these 2 fun treat boxes. 

I just LOVE this little purse and can't wait to make another one. The gal running the make and take, Maggi, was uber sweet and gave us gals in the class some left over die cuts. One of the things I received was  another pre-cut purse template, so I'm going to turn it into a pdf and try to figure out how to put it on the blog for y'all to print it out too. Just give me a few days :) and when i figure it out I'll let y'all know on Facebook.

 I couldn't resist adding a little DeNami love to it when I got home :)

This little guy is called a Tootsie Roll Holder. How cute is this?!?!?! He makes me smile every time I look at him :)


That's it for me today, short and sweet...sorry! But don't forget, tomorrow is World Card Making Day!!! I'm getting a head start on Christmas with an all day Bo-Bunny class...I'm way excited. What are you planning????

Thursday, October 3, 2013

Paper Sweeties - sweet inspiration

Hi everyone!! I know it's only Thursday, but I wanted to enter the month long challenge going on at Paper Sweeties. I know it was just announced yesterday morning...but why procrastinate?? Besides, I enter this one now and then I still have a whole month to make at least one more to enter!! hehehehe There is a method to my madness ;)  Also, there's another little challenge that I want to enter. Thanks to Paper Sweeties, I found  a little company that has the PERFECT little organization tool for ribbon! I'd never heard of them or knew such a thing existed until I saw it on the Paper Sweeties blog..how cool!! It's called a ribbon carousel and is by the Ribbon Carousel Company. They sponsor a challenge on their blog randomly picking a winner for one of their carousels...Woo-Hoo!!
 
Ribbon Carousel's theme: Fall & Halloween creations!!!
 
 
Usually Paper Sweeties offers us a sketch to work with, but this month they changed it up and gave us an inspiration picture along with some beautiful fall colors......


I puffy heart this....just sayin'
 
Here's my take on the adorable inspiration....


I decided to pull out the Emma stamp along with her little Sweet Cuts die and go from there. I stamped and fussy cut the wagon from the Sweeties Wagon set then decided on the outfit that I wanted her to wear...the dress from Jelly Bean Time. After I fussy cut her dress from patterned paper I decided I wanted to add a fun element like tulle. Unfortunately I didn't have anything that matched! I did however something that with a lot of tedious work that would...see the little velvet strip on her dress, well, that's part of some ribbon I have and it has the frilly sheer part on either side of it. For the first layer I simply cut the sheer part from one side then glued it onto the dress. To finish the rest of the dress I cut the sheer part from both sides of the velvet and started filling in her dress with the little strips. 


A toothpick, pair of tweezers some Chrystal Lacquer and a few choice words later, I had her dress completed...whew! I pulled out some fun fall patterned papers and started layering. I opted for an easy layout so that little Emma would stand out. Earlier I had made a little tag using the Borders set from Paper Sweeties along with the DeNami Polka Dot Background and the Thoughtful Greetings set. But no matter how I tried to attach it I just wasn't happy. I finally decided that "simple is best" and left it like this...unfinished.
 
Well I hope y'all like her as much as I do :)   See ya here tomorrow with a fun little Halloween project!!

Wednesday, October 2, 2013

Scarecrow Fun

Hello and happy hump day my friends!! That commercial will forever be stuck in my brain, lol!!

I am just so blessed to have been able to surround myself with the most awesome people that I've met through card making. You all are just amazing! :)  Recently a friend, Debbie, creator and owner of Paper Sweeties stamp company did a little make and take class in her home town of Raleigh, NC. I would have LOVED to attend, buuuuut that's a bit of a drive from Missouri, lol. ;) Anyway, I commented how DARLING the card was...trust me, it was and it just tickles me giddy every time I see it! Have you ever seen a card that just "speaks" to you?? Her little scarecrow just captured my heart!!
 
So one day I was just minding my own business and decided to grab the bills (face it, that's what we always receive...sigh) out of the mailbox and what did I find mixed in...HAPPY MAIL!!!! I had no clue what was in it and quickly tore into the envelope....GASP, it was a scarecrow card card kit from Debbie's make and take class!!! My heart jumped with joy!!! I was so happy I felt like twirling and singing...tried to do my best Julie Andrews impression but definitely failed...ohh well, it didn't matter, I had me a scarecrow card kit of my very own!!!!
Now Debbie claims it was a thank you gift for helping her figure out a little photo edit issue, but honestly, I didn't do anything!! She'd have figured it out on her own, honestly. She didn't need me at all :) But boy was I ever happy that she sent me this darling little gift!!! And look at her sweet little note card! I just love the simpleness of it and the colors...so pretty!!!
 
Well, I guess ya'll'd like to see the finished card now wouldn't ya?? Hmmm, I guess I could share his utter cuteness....
 
 
Looking at him now still makes me as happy as when I first saw him...he's so stinkin' cute!! The sentiment is from Paper Sweeties but the rest is just die cuts that make him up...too fun, right??